In today’s digital age, the performance and reliability of your website can significantly impact your online presence. Whether you’re a blogger, entrepreneur, or developer, choosing the right hosting solution is crucial.
As your site grows, shared hosting may no longer suffice. Enter Virtual Private Servers (VPS), offering dedicated resources, control, performance, and security surpassing shared hosting.
However, managing a VPS, especially for WordPress, can be daunting. Here’s where FlyWP excels. Designed for WordPress users, FlyWP is the ultimate cloud server management control panel.
Simplifying VPS management, FlyWP provides an intuitive platform rich in features, enhancing your WordPress experience seamlessly.
Explore the benefits of VPS hosting, how FlyWP elevates WordPress, and why it’s ideal for optimizing your site’s performance and security. Elevate your WordPress sites with VPS Hosting with FlyWP, Cloud Server Management.
Here’s why VPS hosting is a game-changer:
Enhanced Performance: Enjoy dedicated resources for faster load times and better site performance.
Scalability: Easily scale resources to handle traffic spikes and growing needs.
Control: Full control over your server environment to customize settings and install preferred software.
Security: An isolated environment enhances security and reduces risks compared to shared hosting.
if you’re managing WordPress sites, look no further than FlyWP!
FlyWP is the ultimate cloud server management control panel designed specifically for WordPress. It offers:
✨ Intuitive Interface: Manage your WordPress sites effortlessly with an easy-to-use dashboard.
Top-Notch Security: Built-in security features to keep your sites safe.
Performance Optimization: Tools to enhance your website’s speed and efficiency.
Comprehensive Tools: Everything you need for backups, updates, and monitoring in one place.
Recommended VPS Servers for FlyWP
FlyWP is a Docker-powered WordPress server management platform, offering robust and versatile capabilities across various cloud providers.
This innovative approach allows you to deploy, manage, and optimize your WordPress sites effortlessly on any cloud infrastructure. Here are some top VPS options to consider for seamless integration with FlyWP:
DigitalOcean
DigitalOcean provides a simple and developer-friendly environment with scalable VPS (droplets). Its straightforward interface and competitive pricing make it a popular choice for WordPress hosting. FlyWP takes advantage of DigitalOcean’s SSD-based droplets to deliver fast and efficient performance for your WordPress sites.
Vultr
Vultr offers high-performance VPS with global data center locations, making it ideal for sites requiring low-latency and high-speed connectivity. FlyWP’s Docker-based management pairs perfectly with Vultr’s reliable and scalable infrastructure, ensuring smooth operation and quick deployments.
Linode
Known for its high reliability and customer support, Linode is another excellent option for FlyWP users. Its powerful VPS solutions, combined with FlyWP’s containerized approach, provide a robust platform for WordPress hosting. Linode’s flexibility and performance align well with FlyWP’s management capabilities.
AWS (Amazon Web Services)
AWS offers a vast array of cloud services with its EC2 instances providing scalable and customizable VPS options. FlyWP’s Docker containers can easily integrate with AWS, allowing you to utilize its extensive cloud resources while maintaining efficient WordPress management.
GCP (Google Cloud Platform)
GCP delivers high-performance virtual machines with comprehensive tools and services. FlyWP’s compatibility with GCP ensures that you can leverage Google’s powerful cloud infrastructure while managing your WordPress sites effectively with Docker.
Hetzner
Hetzner is known for its cost-effective VPS solutions without compromising on performance. Its high-quality hardware and competitive pricing make it a great fit for FlyWP, allowing you to run and manage WordPress sites efficiently within Docker containers.
Microsoft Azure
Microsoft Azure provides flexible cloud services with a strong focus on enterprise solutions. FlyWP can easily integrate with Azure’s virtual machines, offering robust and scalable WordPress hosting backed by Azure’s global network and advanced security features.
Hostinger
Hostinger offers affordable and high-performance VPS hosting, making it a suitable choice for FlyWP. With SSD storage and a user-friendly interface, Hostinger’s VPS ensures that your WordPress sites run smoothly and efficiently within FlyWP’s Docker environment. It’s ideal for those seeking a cost-effective yet powerful hosting solution.
Custom Servers
FlyWP’s Docker-powered platform is not limited to standard cloud providers. You can also deploy FlyWP on custom servers, offering the same level of performance and flexibility. Whether you’re using an in-house server or a unique cloud setup, FlyWP’s containerized approach adapts to your specific environment, providing streamlined WordPress management.
Upgrading to a Virtual Private Server (VPS) can transform your WordPress hosting experience, offering enhanced performance, scalability, and security.
When paired with FlyWP, the Docker-powered WordPress server management platform, you unlock seamless control and optimization across a wide range of cloud providers such as DigitalOcean, Vultr, Linode, AWS, GCP, Hetzner, Azure, Hostinger, and custom servers.
Whether you’re managing a growing blog or a high-traffic business site, FlyWP simplifies VPS management, making it easy to harness the full potential of your server. Embrace the power of VPS with FlyWP, and elevate your WordPress site to new heights of efficiency and reliability!
FlyWP offers a dynamic hosting solution for WordPress users, empowering them with the ability to fine-tune server configurations to suit their exact needs.
Among its array of features, FlyWP allows users to integrate custom Nginx rules, granting unparalleled flexibility in optimizing server performance and functionality.
This guide aims to provide a detailed walkthrough of the process involved in adding custom Nginx rules on FlyWP, facilitating users in tailoring their server configurations for enhanced performance and versatility.
Step 1: Access the Nginx Configuration Directory
Begin by accessing the directory on your server where the Nginx configuration files are stored. This can be achieved through SSH connection.
ssh fly@ip-address
cd domain.com/config/nginx/custom/server/
Step 2: Create a New Configuration File
Once within the designated directory, create a new configuration file where your custom Nginx rules will reside. Select a descriptive filename to ensure clarity in identifying its purpose.
touch extra.conf
Step 3: Define Custom Nginx Rules
Open the newly created configuration file (extra.conf in this instance) using a preferred text editor. Here, you can define the specific Nginx rules that align with your server requirements.
Customize these rules as needed, leveraging Nginx’s extensive range of directives to tailor your server configuration to exact specifications.
Step 4: Save and Apply Configuration Changes
After defining your custom Nginx rules, save the configuration file to ensure the changes take effect.
Step 5: Restart the Nginx Server
To enact the newly applied configuration, it’s essential to restart the Nginx server. This can be conveniently accomplished through the Fly Site Dashboard:
Log in to your Fly Site Dashboard.
Navigate to the “Manage” section.
Select “Restart Nginx” to initiate the changes.
With these comprehensive steps, users can seamlessly integrate custom Nginx rules on FlyWP, unlocking unparalleled control over server configurations.
Whether enhancing security protocols, optimizing performance, or expanding functionality, FlyWP empowers users to craft tailored server environments conducive to their WordPress site’s success.
Experiment with diverse Nginx directives to fine-tune server settings, ensuring optimal performance and security for your WordPress site hosted on FlyWP.
WordPress, the powerhouse behind millions of websites on the internet, is gearing up for yet another major release – WordPress 6.5. Scheduled for launch on March 26, 2024, this update brings a plethora of new features, improvements, and enhancements aimed at making the WordPress experience even more seamless and powerful for developers and users alike.
Let’s dive into the highlights of WordPress 6.5:
1. Introducing the Interactivity API
The Interactivity API introduces a standardized approach for developers to add interactions to the frontend of their blocks. This empowers developers to create more engaging and dynamic user experiences within WordPress websites.
With the Font Library feature, managing fonts directly within the Editor becomes a breeze. Developers now have access to a set of APIs to control, adapt, and disable font behavior, providing more flexibility and customization options.
3. Enhancing Block Functionality with Block Bindings API
The Block Bindings API allows developers to populate Block content with external data such as post metadata or custom PHP logic. This opens up new possibilities for creating dynamic and data-driven blocks within WordPress.
The Plugin Dependencies feature plugin has been merged into the WordPress Core, streamlining the management of plugin dependencies and ensuring smoother plugin interactions.
5. Script Modules API for JavaScript Module Support
The Script Modules API introduces native JavaScript Module support to WordPress 6.5, providing developers with powerful tools for building interactive and modular frontend experiences.
With the integration of the Performant Translations feature plugin into Core, WordPress 6.5 delivers enhanced internationalization capabilities, making it easier for users to translate and localize their websites efficiently.
WordPress 6.5 embraces the future of image formats with built-in support for AVIF, offering improved image quality and faster loading times for websites.
In addition to these exciting features, WordPress 6.5 also includes several updates and breaking changes, such as raising the minimum version of MySQL, updates to PHP_CodeSniffer and PHPMailer, and changes to @wordpress/scripts support for Node.js versions.
For plugin developers, ensuring compatibility with WordPress 6.5 is crucial. By testing and updating plugins to reflect compatibility with the latest version, developers can ensure a smooth transition for users and maintain the trust and reliability of their plugins.
With WordPress 6.5 on the horizon, the WordPress community eagerly awaits the launch of this feature-packed update, poised to elevate the WordPress experience to new heights.
Spectra is the rebuilt and reimagined version of Essential Add-ons for Gutenberg. It’s currently only available as a free version, but a pro version is coming soon.
One of the key features of Spectra is its ability to pick up global settings from any theme, giving you the flexibility to use it with your preferred theme.
While it doesn’t support dynamic content out of the box, it still offers a simple set of tools that can help you create fast loading Gutenberg block based websites. Check out Spectra and see if it aligns with your needs.
2. Cadence Blocks
Cadence Blocks is a simple and easy-to-use block level plugin with plenty of features. It recently had a major update, improving both its appearance and functionality.
While the pro version is required for dynamic content, the free version offers enough for most use cases and allows you to familiarize yourself with the plugin.
With its logical organization and compatibility with other Gutenberg block level plugins, Cadence Blocks is definitely worth checking out.
3. Stackable
Stackable is another great block level plugin that works well alongside Cadence. It offers both a free and pro version, with the pro version currently going through some updates.
One of the standout features of Stackable is its wide range of pre-designed blocks and layouts that you can customize within the interface itself.
Whether you want to start from scratch or use pre-designed layouts, Stackable has you covered. Give it a try and see how it can enhance your Gutenberg experience.
4. Generate Blocks
If you’re looking to transition away from using page builders like Elementor and want to move over to Gutenberg, Generate Blocks is a great option.
It pairs up nicely with Generate Press and offers a good combination between theme and block level plugin. While it may seem simple at first, the free version of Generate Blocks gives you the ability to work with dynamic content and use the loop builder.
There are some features locked behind the pro paywall, but the free version still offers enough to get a lot of work done. Check out Generate Blocks and see how it can enhance your Gutenberg experience.
5. GreenShift
GreenShift offers a modular approach to its premium packages, allowing you to customize your plugin based on your specific needs. The free version of GreenShift includes an abundance of options and utilizes modern technologies like CSS grid and flexbox.
However, it can be quite complex, especially for beginners. If you’re new to block based plugins, it may be better to start with other options and then transition to GreenShift once you’re more familiar with Gutenberg. Explore GreenShift and see if it suits your requirements.
6. Qubio
If you’re looking for a good starting point for creating Gutenberg based layouts, Qubio is worth considering. It offers both a free and premium version, with the free version providing plenty of starter designs and elements to help you quickly set up your WordPress site.
The premium version offers additional features and customization options. While it may not be the cheapest option, Qubio does offer lifetime plans and discounts. Give Qubio a try and see if it meets your needs.
7. Maxi Blocks
Maxi Blocks is a free plugin that comes with over 700 free patterns and starter site designs. While the interface may not be the most visually appealing, it offers a wide range of options and utilizes modern technologies to ensure fast loading times.
As it’s still in beta, there may be some improvements and updates in the future. Check out Maxi Blocks and see if it aligns with your Gutenberg needs.
8. Quickly
Quickly is a powerful tool that offers advanced features for working with Gutenberg. It includes Advanced Custom Fields Pro in its license, allowing you to work with dynamic data from the start. With an advanced query builder and filtering capabilities, Quickly offers a page builder-like experience within Gutenberg.
While it may have a steep learning curve and there is no free version available, the features and functionality it offers make it worth considering for those looking to create powerful and optimized Gutenberg-based websites.
These are the top 8 block level plugins that I recommend checking out if you’re looking to transition to Gutenberg. Each plugin offers different features and capabilities, from simple options to more advanced and customizable ones.
Whether you have a budget or not, there’s a plugin on this list that can enhance your Gutenberg experience. If you have any other recommendations, feel free to let me know in the comments. Happy experimenting!
How to Create a Free Multi-vendor Marketplace on Your WordPress Website in 2024
Hey Guyes, This is Rubyat and Today, I will show you how to create a free multi-vendor marketplace on your WordPress website in 2024. With the help of specific plugins and best compatible themes, you can easily set up your own online marketplace where multiple vendors can sell their products.
In this blog, I will guide you through the process of installing the necessary plugins, configuring the settings, choosing a suitable theme, and creating products as a vendor. Let’s get started!
Step 1: Installing WooCommerce
The first step is to install the WooCommerce plugin. WooCommerce is a popular e-commerce solution for WordPress websites. To install it, go to your WordPress dashboard and navigate to the “Plugins” section. Click on “Add New” and search for “WooCommerce”. Install and activate the plugin.
Step 2: Installing the Multi-Vendor Plugin
Next, we need to install a multi-vendor plugin. In this tutorial, we will use the “Dokan Lite” plugin. Search for “Dokan Lite” in the plugin search bar and install the free version of the plugin. Once activated, there will be a setup wizard for the admin to configure the plugin.
Step 3: Configuring the Token
In the setup wizard, you need to configure the token. Set the store URL, commission percentage, payment methods for vendors, and other settings according to your preferences. Once you have completed the setup, your store will be ready to go.
Step 4: Choosing a Compatible Theme
To enhance the look and functionality of your marketplace, it is recommended to choose a compatible theme. In this tutorial, we will use the “Astra” theme, which offers a wide range of free templates.
Install the Astra theme from your WordPress theme menu and import the starter template plugin. You can select any template that suits your needs.
Step 5: Registering as a Vendor
After setting up the admin panel and installing the theme, you can register as a vendor on your marketplace. Visit the WooCommerce “My Account” page and enter your details, including email address, password, first name, last name, shop name, and shop URL.
The shop URL needs to be unique.
Step 6: Creating Products as a Vendor
As a vendor, you can easily create products from the frontend of your website. Simply enter the product name, price, discount price (if applicable), and upload a featured image.
You can also add gallery images, write a description, enable stock management, and customize other product settings. Once you have created a product, it will be pending review by the admin.
Step 7: Admin Approval and Product Publishing
The admin can review and approve the vendor’s products from the backend. Once approved, the products will be published on the vendor’s store page and ready for sale. Customers can visit the store page, browse through the products, and make purchases.
Step 8: Making a Test Purchase
To demonstrate the commission and withdrawal process, you can register as a customer and make a test purchase. After registering, visit the shop page, select a product, and proceed to checkout.
Please note that in this blog, we have not set up any payment gateway, so you can simulate the checkout process without actually making a payment.
Step 9: Enabling a Payment Gateway
In order to accept payments from customers, you need to enable a payment gateway. Depending on your website’s requirements, you can choose from various WooCommerce-compatible payment gateways such as PayPal, Stripe, or Bank Transfer.
In this tutorial, we have enabled the Cash on Delivery option as an offline payment method.
Step 10: Vendor Dashboard and Order Management
As a vendor, you will have access to a clean and user-friendly dashboard. From the vendor dashboard, you can manage your products, view orders, and update order statuses.
You can also add shipping tracking numbers for customers’ reference. Additionally, the vendor can request a withdrawal of their earnings, which needs to be approved by the admin.
Conclusion
Creating a multi-window marketplace on your WordPress website is now easier than ever. By installing plugins like WooCommerce and Dokan Lite, configuring the settings, choosing a suitable theme, and creating products as a vendor, you can set up your own online marketplace without any financial investment.
Whether you are a small business owner or an individual looking to sell products online, this tutorial provides a step-by-step guide to help you get started. Happy selling!
Create a Professional Website in 10 Minutes in 2024
Hey welcome to TechRubyat blog. if you are here thats mean you have interest to know how to create a nice website in 10 minutes. In this blog, I am going to share quick and easy process to create a professional website in just 10 minutes.
It is a common misconception that creating a website requires hours of labor and knowledge of coding, but this is untrue.
Even if you don’t have any prior website creation knowledge, you can simply construct one with the correct platforms and tools.
You will receive step-by-step instructions on how to rapidly and effectively build your own website in this lesson.
Getting Started to Create a Professional Website in 10 Minutes
To begin, go to techrubyat.com/hostinger, our partner link, to get the best deal on hosting services. You can also copy and paste the link from our description or click on it directly. Once you are on the website, click on “Claim Deal” to explore the available options.
Choosing the Right Plan
Hostinger offers three different options for hosting plans. It is important to read through the details and understand the differences between them. We recommend selecting one of the plans for a longer duration, such as 48 months, as it offers the best value for money.
Avoid choosing the one-month plan, as it will cost you more in the long run.
Creating Your Account
After selecting the hosting plan, you can proceed to create your account. Enter your payment information but do not click submit just yet. Before submitting, make sure to click on “Have a Coupon Code” and enter the code “DISCOUNT7” to receive a 7% discount on your entire order.
Once you have entered the coupon code, you can click submit and create your password. After that, click on “Start” to begin the setup process.
Claiming Your Free Domain
If you have chosen a hosting plan for at least one year, you will be eligible for a free domain. Take this opportunity to select a domain name that represents your website.
For example, if you are running a protein supplement company, you can choose a domain name like “centralsupplements.com”. Make sure the domain is available and select the appropriate extension (.net or .com). Enter your contact details and complete the setup process.
Installing WordPress
Once the setup process is complete, you can go to the “Manage Site” section and click on “Website”. Scroll down and look for “Auto Installer”. This tool will help you install WordPress easily.
Click on “Select” for WordPress and proceed to choose a website title and admin name. Remember to set a strong password for your WordPress account. Click “Install” to begin the installation process.
Selecting a Theme
After installing WordPress, you will be redirected to the WordPress dashboard. To customize the appearance of your website, go to “Appearance” and click on “Themes”.
I recommend installing the Astra theme, which is a popular choice for its versatility and user-friendly interface. Click on “Add New” and search for the Astra theme. Once you find it, click on “Install” and then “Activate”.
Using Starter Templates
With the Astra theme activated, go to “Dashboard” under Astra. Here, you will find an option to install Starter Templates. This feature allows you to build your website using pre-designed templates, saving you time and effort.
If your website is an online shop, you can search for relevant templates such as “supplements”. Choose a template that fits your needs and select it for your website.
Customizing Your Website
Now that you have selected a template, you can start customizing your website. Begin by uploading your logo and adjusting its size and position. Choose the colors and font pairing that align with your brand identity. Once you are satisfied with the changes, submit and build your website.
Editing Your Website
To make further changes to your website, click on “Edit with Elementor”. Elementor is a drag-and-drop editor that allows you to easily modify the content and layout of your website.
You can add or remove sections, columns, and elements by simply dragging and dropping them. Double-click on text to edit it, and use the left side panel to customize various aspects of your website.
Responsive Design
It is important to ensure that your website looks good on different devices. Click on the responsive mode icon and select “Mobile” to preview your website’s mobile version.
Make any necessary adjustments to optimize the layout for mobile users. Remember to click on the “Update” button frequently to save your changes.
Using WordPress Dashboard
Aside from website customization, the WordPress dashboard allows you to manage other aspects of your website. Under “Posts”, you can create and manage blog posts.
“Pages” is where you can find and update static pages like the About and Home pages. Remember to delete any unnecessary pages that came with the template. Additionally, you can manage plugins under the “Plugins” section. Keep your plugin usage minimal and only install necessary ones.
Settings and Permalinks
Under “Settings”, make sure to review your site title and WordPress address to ensure they are correct. It is important to have SSL enabled, indicated by the “https://” in your WordPress address.
In the “Permalinks” section, select the “Post name” option for easier management of page URLs. Don’t forget to save changes after making any updates.
Conclusion
In just 10 minutes, you can create a professional website using the methods outlined in this blog. By following the step-by-step instructions, you can easily customize your website, add content, and make it visually appealing.
Remember to regularly update and maintain your website to ensure it remains functional and relevant. If you want to learn more about using Elementor and taking your website to the next level, check out our free training in the description below. Good luck with your website creation!
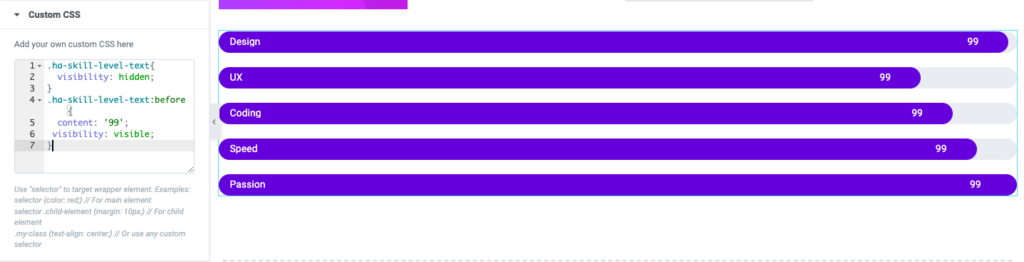
Happy Addons is a popular WordPress plugin that offers a wide range of widgets and features to enhance your website’s functionality and design. One of the most useful features of Happy Addons Skill Bar widget, which displays progress bars for different skills and abilities. However, some users may want to hide the percentage from the Skill Bar widget to give their website a cleaner look. In this article, we will show you how to do just that.
Unfortunately, Happy Addons does not provide a built-in option to Hide Percentage from Happy Addons Skill Bar Widget. However, you can achieve this by adding custom CSS code to your website. Here are the steps to follow:
Step 1: Navigate to the Happy Addons settings pagefor Happy Addons Skill Bar
To begin, log in to your WordPress dashboard and navigate to the Happy Addons settings page. You can find this by going to ‘Happy Addons’ in the left-hand menu and clicking on ‘Settings.’
Step 2: Enable custom CSS
Once you’re on the Happy Addons settings page, scroll down until you see the ‘Advanced’ section. Here, you’ll see an option to ‘Enable Custom CSS.’ Toggle this option to ‘On’ to enable custom CSS on your website.
Step 3: Add the custom CSS code
Now that you’ve enabled custom CSS, it’s time to add the code that will hide the percentage from the Skill Bar widget. Here is the code you need to add:
Copy this code and paste it into the ‘Custom CSS’ box on the Happy Addons settings page. Make sure to save your changes when you’re done.
Step 4: Check your website
That’s it! The custom CSS code should now be applied to your website, and the percentage should be hidden from the Skill Bar widget. If you want to change the number that appears in place of the percentage, you can edit the number in the ‘content’ property of the CSS code. For example, if you want to display ‘100’ instead of ’99’, simply change ‘content: ’99’;’ to ‘content: ‘100’;’.
In conclusion, Happy Addons is a powerful plugin that offers a lot of great features for WordPress websites. While there is no default option to hide the percentage from the Skill Bar widget, adding custom CSS code is a simple and effective way to achieve this. With the steps outlined above, you should be able to hide the percentage and give your website a cleaner look.
The newest wearables for 2023 will help you stay connected and in shape. Given the variety of options available, selecting the best one might be difficult.
We’ll highlight the best smartwatches in this guide that incorporate cutting-edge technology for a range of lifestyles. Come along as we examine the top smartwatches of 2023, suitable for both fitness lovers and tech-savvy people.
The Best Smartwatches of 2023: Top Picks for Health, Fitness, and Connectivity
By 2023, smartwatches will be a necessary piece of equipment for anyone who values connectivity and good health.
This post will review the best 15 smartwatches of 2023 (December Update), which include state-of-the-art hardware, connectivity, and health features.
Introducing the Apple Watch Series 9, the perfect partner for leading a healthier lifestyle. Its cutting-edge touch-free interaction technology and beautiful display, driven by the S9 chip, make navigation a breeze.
With cutting-edge features like blood oxygen monitoring, ECG readings, sleep tracking, and emotional well-being analysis, you can uncover profound health insights. It is your fitness ally, providing you with a variety of exercise options and three months of Apple Fitness+ for in-depth instruction.
Fall and Crash Detection prioritizes safety by guaranteeing immediate emergency aid. It streamlines operations, such as using Apple Pay and unlocking your Mac, and is seamlessly linked with Apple devices.
Enjoy infinite personalization by choosing from a variety of bands and faces that may be customized to fit your mood or style. With the Apple Watch Series 9’s unparalleled capabilities, elevate your lifestyle.
+ Larger screen area for a better viewing experience + Improved performance with the faster Apple S7 SiP + Have blood oxygen sensor, heart rate monitor, and ECG + Water resistance for swimming and other water activities + Interchangeable bands for customization + Comprehensive connectivity options, including Bluetooth, Wi-Fi, and cellular
REASON TO AVOID
– Higher price point than other smartwatch options – Limited battery life (up to 18 hours with typical use) – Compatibility limited to iPhones only
In terms of appearance and health monitoring, the Samsung Galaxy Watch 4 is outstanding. Fitness enthusiasts can utilize its sophisticated capabilities, which include GPS tracking, heart rate monitoring, and sleep tracking.
Apart from its fashionable design, the watch has comprehensive health monitoring capabilities, including options for monitoring blood pressure, heart rate, and ECG. Its several training modes accommodate a variety of exercises, and its embedded GPS tracks outdoor workouts in real time.
Because of its longer battery life and cellular connectivity for calls and messages. The Galaxy Watch 4 is without a doubt the greatest choice out there because to its perfect mix of fitness tracking, connectivity, and fashionable design. It is predicted to dominate the smartwatch market in 2023.
Design: The Samsung Galaxy Watch 4 has a sleek and stylish design that is both elegant and functional, making it a great accessory for any outfit.
Performance: The device is powered by a powerful Exynos W920 processor and runs on the latest version of Wear OS, providing a smooth and intuitive user experience.
Health and Fitness Features: The Samsung Galaxy Watch 4 comes loaded with advanced health and fitness features, including heart rate monitoring, blood oxygen level tracking, and sleep tracking, making it a great choice for anyone looking to improve their overall health and wellness.
Connectivity: The watch offers seamless connectivity with your smartphone, allowing you to receive notifications, make and receive calls, and control your music and other smart home devices right from your wrist.
Battery Life: The Samsung Galaxy Watch 4 has a long-lasting battery life that can last up to 40 hours on a single charge, making it a reliable and convenient device for everyday use.
REASON TO AVOID
Price: The Samsung Galaxy Watch 4 is a premium smartwatch that comes with a high price tag, which may be a barrier for some buyers.
Compatibility: The device is designed to work best with Samsung smartphones, so if you own a different brand of phone, you may experience some compatibility issues.
Design: The Garmin Venu 2 has a sleek and stylish design that is both functional and fashionable, making it a great accessory for any outfit.
Health and Fitness Features: The Garmin Venu 2 is loaded with advanced health and fitness features, including heart rate monitoring, blood oxygen level tracking, and sleep tracking, making it a great choice for anyone looking to improve their overall health and wellness.
Sports Modes: The device comes with a wide range of sports modes that are tailored to specific activities, making it easy to track your workouts and stay motivated.
Battery Life: The Garmin Venu 2 has a long-lasting battery life that can last up to 11 days on a single charge, making it a reliable and convenient device for everyday use.
Customization: The watch offers a high degree of customization, allowing you to choose from a variety of watch faces and widgets to personalize your device.
REASON TO AVOID
Price: The Garmin Venu 2 is a premium smartwatch that comes with a high price tag, which may be a barrier for some buyers.
Limited App Ecosystem: Although the device can run some third-party apps, the selection may be limited compared to other smartwatch platforms.
Limited Voice Assistant: The Garmin Venu 2 only supports the Garmin voice assistant, which may be a deal-breaker for those who prefer other voice assistants such as Google Assistant or Alexa.
The Garmin Venu 2 is a top-rated smartwatch in 2023 for its comprehensive health tracking features. It includes advanced sensors that can measure skin temperature, oxygen saturation, and even stress levels.
The watch also features built-in GPS, NFC payments, and over 20 workout modes, making it a versatile option for both fitness enthusiasts and everyday users.
Smartwatches have become increasingly popular over the years, with more and more people opting for these wearable devices to help them keep track of their fitness goals, stay connected with their smartphones, and even pay for purchases without having to carry a wallet.
Health and Fitness Features: The Fitbit Sense is loaded with advanced health and fitness features, including heart rate monitoring, ECG tracking, skin temperature monitoring, and sleep tracking, making it a great choice for anyone looking to improve their overall health and wellness.
Stress Management: The device comes with built-in stress management tools, including guided breathing sessions and mindfulness exercises, making it a great choice for those who want to improve their mental health and well-being.
Design: The Fitbit Sense has a sleek and modern design that is both functional and fashionable, making it a great accessory for any outfit.
Compatibility: The watch is compatible with both iOS and Android smartphones, making it a great choice for anyone looking for a device that can seamlessly integrate with their existing technology.
REASON TO AVOID
Limited App Ecosystem: Although the device can run some third-party apps, the selection may be limited compared to other smartwatch platforms.
Price: The Fitbit Sense is a premium smartwatch that comes with a high price tag, which may be a barrier for some buyers.
No GPS: The device does not have built-in GPS, which may be a problem for those who need accurate location tracking for outdoor activities.
Limited Voice Assistant: The Fitbit Sense only supports the Amazon Alexa voice assistant, which may be a deal-breaker for those who prefer other voice assistants such as Google Assistant or Siri.
No Music Storage: The device does not have built-in music storage, which may be a problem for those who like to store a large number of songs on their watch.
The Fitbit Sense is another great option for those who prioritize health and wellness. It features advanced sensors that can track skin temperature, heart rate variability, and oxygen saturation. The watch also includes built-in GPS and over 20 exercise modes, making it a great choice for fitness enthusiasts.
If you’re in the market for a high-end smartwatch that can help you live a healthier and more connected lifestyle, the Fitbit Sense is an excellent choice. With its sleek and modern design, advanced health and fitness features, and a variety of smartwatch capabilities, this device is the perfect companion for anyone looking to stay on top of their game.
Design: The Huawei Watch GT 2 Pro has a premium and stylish design, featuring a high-quality titanium case and sapphire crystal display, making it a great choice for those who want a fashionable and durable device.
Battery Life: The device has a long battery life that can last up to 14 days on a single charge, making it a convenient and reliable device for everyday use.
Fitness Tracking: The Huawei Watch GT 2 Pro offers a variety of advanced fitness tracking features, including GPS tracking, heart rate monitoring, and a variety of workout modes, making it a great choice for anyone who wants to improve their fitness.
Sleep Tracking: The device also has sleep tracking capabilities, allowing users to monitor their sleep patterns and make adjustments to improve the quality of their sleep.
Compatibility: The watch is compatible with both Android and iOS smartphones, making it a great choice for anyone looking for a device that can seamlessly integrate with their existing technology.
REASON TO AVOID
Limited App Ecosystem: The device does not support third-party apps, limiting its functionality compared to other smartwatch platforms.
No NFC: The Huawei Watch GT 2 Pro does not have NFC capabilities, making it unable to make contactless payments.
No Voice Assistant: The device does not have a built-in voice assistant, which may be a deal-breaker for those who rely heavily on voice commands.
No Cellular Connectivity: The watch does not have cellular connectivity, meaning that it must be connected to a smartphone in order to receive notifications and make calls.
Price: The Huawei Watch GT 2 Pro is a premium smartwatch that comes with a high price tag, which may be a barrier for some buyers.
The Huawei Watch GT 2 Pro is a premium smartwatch that offers advanced features like GPS tracking, voice commands, and mobile payments. It also features a long battery life, making it a great option for those who need a watch that can keep up with their busy lifestyle.
Overall, the Huawei Watch GT 2 Pro is an excellent choice for anyone looking for a premium smartwatch that offers advanced features and a stylish design.
Whether you’re a fitness enthusiast or simply looking for a device that can help you stay connected to your digital life, this smartwatch is a great choice.
The Fossil Gen 6 is a stylish smartwatch that offers a range of features, including heart rate monitoring, GPS tracking, and NFC payments. It also boasts a long battery life and a variety of customizable watch faces, making it a great choice for those who want a watch that reflects their personal style.
> LTE connectivity allows you to make calls and send messages without the need for a smartphone. > Large, high-quality display with a resolution of 400 x 400 pixels. > Dual-display technology that switches between a low-power LCD screen and a high-resolution OLED screen to conserve battery life. > GPS and heart rate monitoring for fitness tracking. > Built-in Google Assistant for voice commands and controlling smart home devices.
REASON TO AVOID
> Limited app selection compared to other smartwatches such as Apple Watch and Samsung Galaxy Watch. > The design may not appeal to everyone, as it has a slightly chunky and industrial look. > Battery life may be shorter if you use the OLED screen extensively. > The price is higher than some other smartwatches on the market. > The watch is not compatible with iOS devices.
The TicWatch Pro 4G/LTE is a top-rated smartwatch that offers cellular connectivity, which means you can make calls and send messages without your phone.
It also features GPS tracking, heart rate monitoring, and NFC payments, making it a versatile option for both fitness enthusiasts and everyday users.
+ Large, high-quality display with a resolution of 454 x 454 pixels. + Long battery life of up to 24 days. + Multiple fitness tracking modes, including 90 sports modes, heart rate monitoring, and sleep tracking. + Built-in GPS and GLONASS for accurate outdoor activity tracking. + Stylish design with a metal body and interchangeable straps.
REASON TO AVOID
# Limited app selection compared to other smartwatches such as – -# Apple Watch and Samsung Galaxy Watch. # The watch lacks LTE connectivity, so you can’t make calls or send messages without your phone. # No support for voice commands or virtual assistants. # Limited customization options for watch faces and notifications. # No NFC support for mobile payments.
The Amazfit GTR 2e is a budget-friendly smartwatch that offers advanced features like GPS tracking, heart rate monitoring, and mobile payments. It also boasts a long battery life, making it a great option for those who need a watch that can keep up with their busy lifestyle.
+ Affordable price point compared to other smartwatches on the market. + Large, high-quality display with a resolution of 360 x 360 pixels. + Multiple fitness tracking modes, including heart rate monitoring, sleep tracking, and built-in GPS. + Google Assistant built-in for voice commands and controlling smart home devices. + Supports NFC payments with Google Pay.
REASON TO AVOID
-Limited app selection compared to other smartwatches such as Apple Watch and Samsung Galaxy Watch. -The design may not appeal to everyone, as it has a slightly chunky and utilitarian look. -Battery life may not be as long as some other smartwatches on the market. -The watch lacks LTE connectivity, so you can’t make calls or send messages without your phone. -Limited customization options for watch faces and notifications.
The Mobvoi TicWatch E3 is a mid-range smartwatch that offers advanced features like heart rate monitoring, GPS tracking, and NFC payments.
It also features a long battery life and a range of customizable watch faces, making it a great option for those who want a watch that reflects their personal style.
+ Long battery life of up to 25 days in normal mode and up to 48 hours in GPS mode. + Built-in GPS and GLONASS for accurate outdoor activity tracking. + Multiple fitness tracking modes, including 100 workout modes, heart rate monitoring, and sleep tracking. + Durable and rugged design that is water-resistant up to 50 meters and meets military-grade durability standards. + Large, high-quality display with a resolution of 454 x 454 pixels.
REASON TO AVOID
-Limited app selection compared to other smartwatches such as Apple Watch and Samsung Galaxy Watch. -The watch lacks LTE connectivity, so you can’t make calls or send messages without your phone. -Limited customization options for watch faces and notifications. -No support for voice commands or virtual assistants. -The design may not appeal to everyone, as it has a bulky and rugged look.
The Honor Watch GS Pro is a rugged smartwatch designed for outdoor enthusiasts and athletes. It has a durable, MIL-STD-810G certified body that can withstand extreme temperatures, shocks, and drops, making it one of the best smartwatches for outdoor activities. It also has a water-resistant rating of up to 50 meters, so you can wear it while swimming or doing water sports.
Overall, the Honor Watch GS Pro is one of the best smartwatches for outdoor enthusiasts and athletes who need a durable, long-lasting watch that can track their fitness and outdoor activities accurately.
Its rugged design, long battery life, and multiple fitness tracking modes make it a great choice for anyone who loves the great outdoors.
Buying Guidefor Best Smartwatches
If you’re in the market for the best smartwatch of 2023, there are several factors to consider before making your purchase. Here are some key considerations to keep in mind:
Health and Fitness Features: One of the most important factors to consider when choosing a smartwatch is the health and fitness features it offers. Look for watches that offer heart rate monitoring, blood pressure monitoring, ECG, and other health tracking features that can help you stay on top of your fitness goals.
Connectivity: Another important factor to consider is connectivity. Look for watches that offer cellular connectivity, allowing you to make calls and send messages without your phone. Also, consider the range of connectivity options available, such as Wi-Fi, Bluetooth, and NFC.
Design and Display: The design and display of a smartwatch are also important factors to consider. Look for watches that offer a sleek and stylish design, as well as a display that is easy to navigate and read.
Battery Life: A long battery life is important for those who need a watch that can keep up with their busy lifestyle. Look for watches that offer a battery life of at least 24 hours or more.
Compatibility: Make sure to choose a smartwatch that is compatible with your smartphone and any other devices you plan to use it with. Check for compatibility with both Android and iOS operating systems.
By considering these factors, you can find the best smartwatch of 2023 that meets your needs and fits your lifestyle. Whether you’re looking for a watch that can help you track your fitness goals or keep you connected on the go, there’s a smartwatch out there that’s perfect for you.
Frequently Asked Questions
Q: What is the best smartwatch of 2023?
A: The best smartwatch of 2023 can vary depending on individual needs and preferences. However, the Apple Watch Series 7 and Samsung Galaxy Watch 4 are widely considered to be top contenders in the market.
Q: What health and fitness features should I look for in a smartwatch?
A: When choosing a smartwatch, it’s important to consider health and fitness features such as heart rate monitoring, blood pressure monitoring, ECG, and fitness tracking modes. Some watches may also offer sleep tracking and blood oxygen monitoring.
Q: Can I make calls and send messages from a smartwatch?
A: Yes, many smartwatches offer cellular connectivity, allowing you to make calls and send messages without your phone. However, it’s important to note that this feature may require an additional monthly service plan.
Q: What is the battery life of a typical smartwatch?
A: The battery life of a smartwatch can vary depending on the model and usage. However, most smartwatches offer a battery life of at least 24 hours or more.
Q: What operating systems are compatible with smartwatches?
A: Most smartwatches are compatible with both Android and iOS operating systems. However, it’s important to check for compatibility with your specific smartphone or device before making a purchase.
Q: How do I choose the best smartwatch for me?
A: To choose the best smartwatch for your needs, consider factors such as health and fitness features, connectivity options, design and display, battery life, and compatibility with your devices. By evaluating these factors, you can find a smartwatch that meets your needs and fits your lifestyle.
Summary
To sum up, the top smartwatch of 2023 combines features for fitness and health, connectivity, display and design, battery life, and device compatibility.
With the Samsung Galaxy Watch 4 and Apple Watch Series 7 leading the market, customers have a variety of options to select from when looking for the ideal wristwatch to suit their unique requirements and tastes.
You may choose the ideal wristwatch for your needs and lifestyle, one that keeps you connected and on top of your fitness objectives, by considering the points this article mentions.
Want to learn how to create a website using WordPress click here
In this Article, I am going to show you how to fix WordPress theme and plugin conflict on your own. This is the same process that developer support will go through to help you. But you can Reproduce WordPress theme and plugin conflict and fix it yourself much faster.
A conflict is a mistake or malfunction caused by two parts of code giving conflicting signals. for instance , plugin A gives the signal to place the order in “Completed” status and Other plugins prevents this from happening.
Themes and plugins provide additional functionality and features — it also means more code is running on your website and therefore the risk of incompatibility is higher.
we attempt to make sure compatibility with our own extensions, but third-party products made for WooCommerce aren’t bound to work with our software. during this documentation page, we’ll explain the way to test for plugin and theme conflicts.
WordPress theme and plugin conflict – Developer’s Way
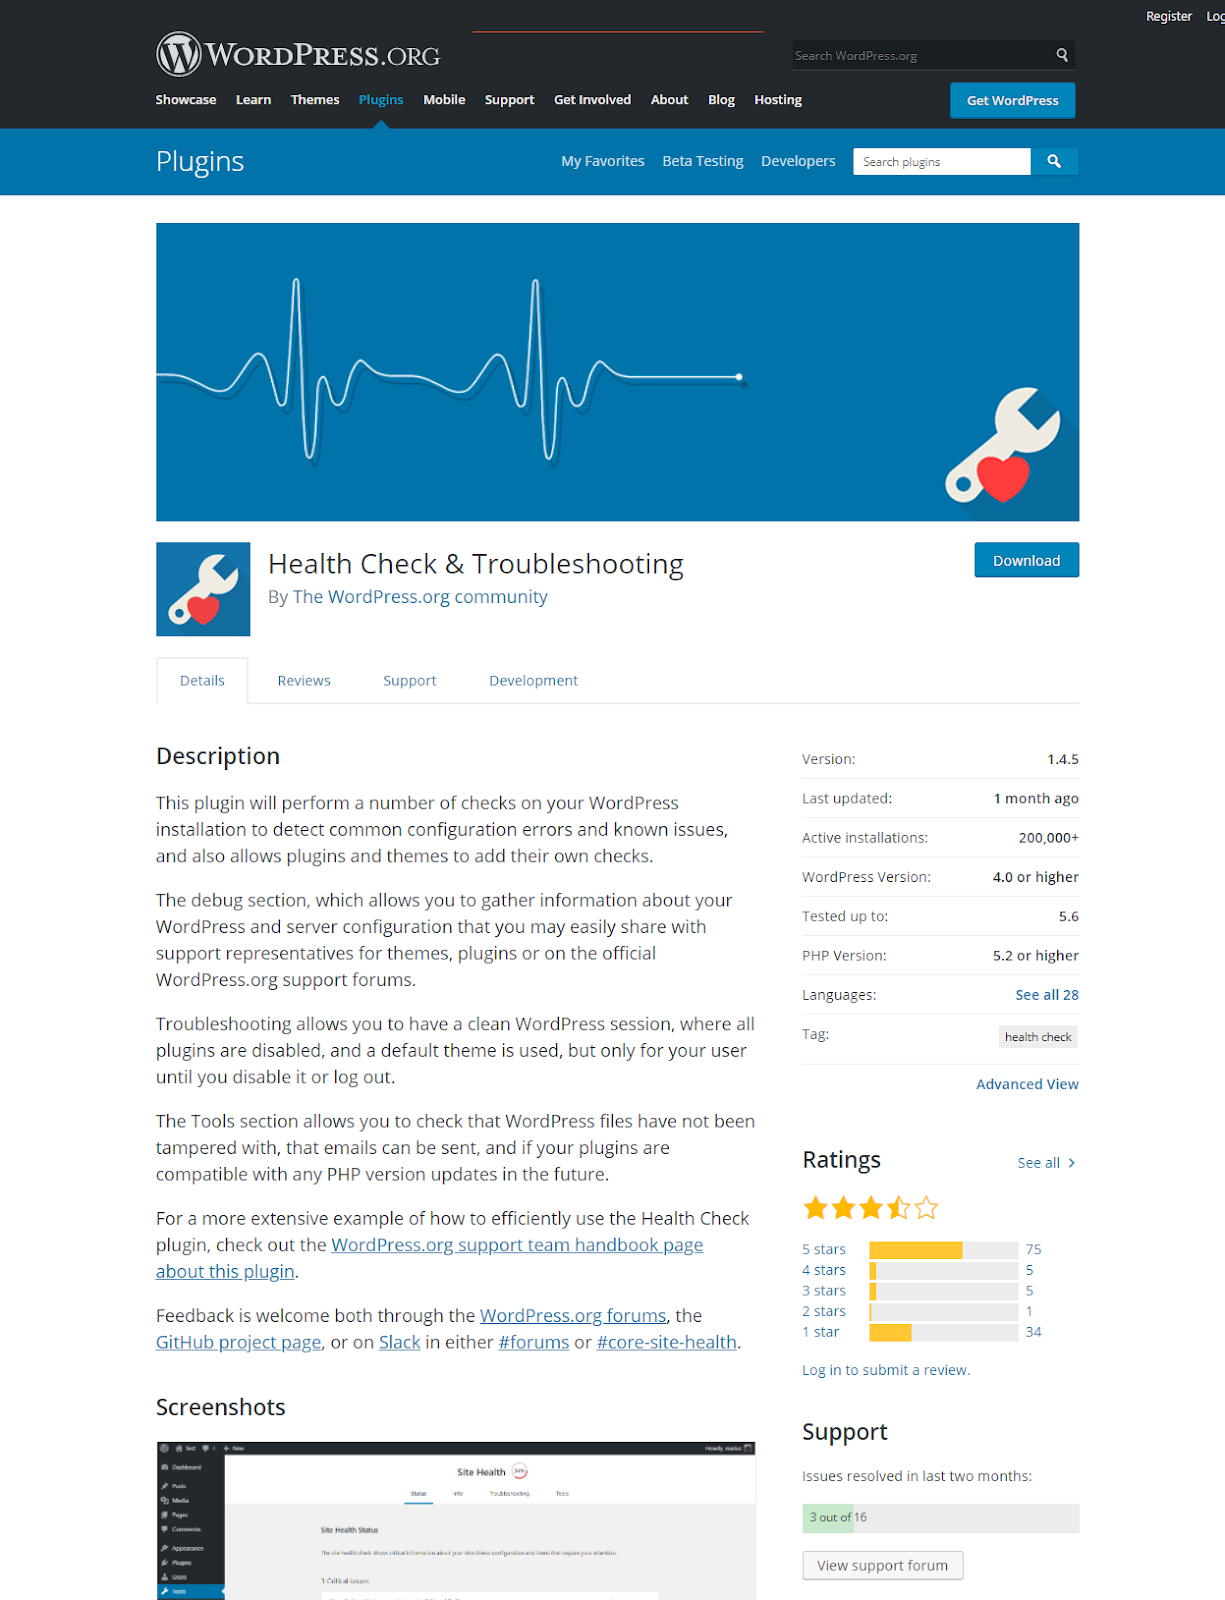
For checking plugin/theme conflicts I recommend using this plugin
Basically you will be able to check conflict without affecting the actual site.
There are lots of ways to fix WordPress theme and plugin conflict. We have some plugins for checking which plugins conflict actually. But this is not the good way, sometimes conflict checker third party plugins can’t give you the appropriate result.
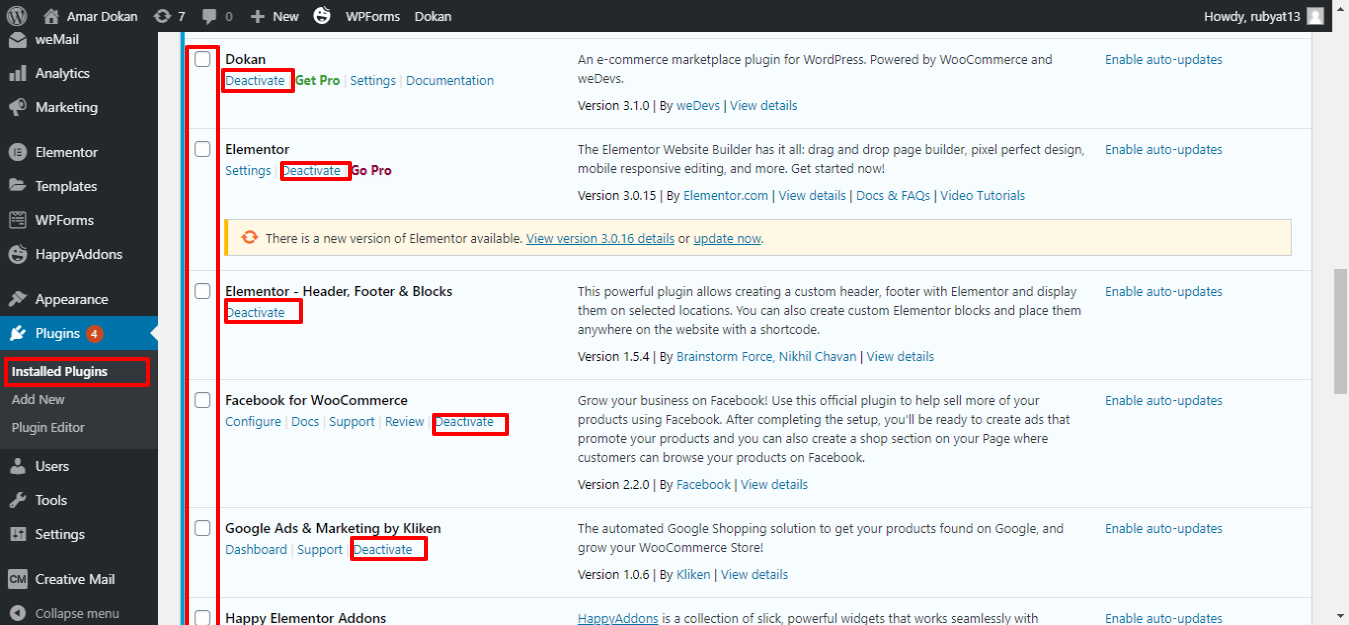
I always prefer to check manually. When something occurred in your word press site, Please create staging site on your server than just go to your plugins tab and select all plugins and deactivate all off them, please make sure is there any page builder or dependent plugins or not.
Do not deactivate page builder plugins, after that active again all plugins one by one. By using this procedure you will get the culprit for sure most of the time.
A career Development Seminar at Chirirbandar was held in 2018, which was called “প্রেরনারগল্প” or “Stories of Inspiration”. In the rural upazila of Chirirbandar the seminar was organized to motivate and inspire school students to pursue their dreams and achieve their goals. One of the keynote speakers at the seminar was Al Rubyat Shuvho, a software engineer and a WordPress lover.
Al Rubyat Shuvho is a young and talented software engineer who has made a name for himself in the industry. He has worked on several high-profile projects and has been recognized for his skills and expertise. Despite his success, Shuvho has remained humble and down-to-earth, and has always been eager to share his knowledge and experience with others.
At the career development seminar, Shuvho spoke passionately about his journey as a software engineer and the challenges he faced along the way. He shared his experiences and insights with the students, urging them to believe in themselves and to never give up on their dreams.
Career Development Seminar at Chirirbandar – Stories of Inspiration
Shuvho’s speech was particularly inspiring for the students, many of whom had never met a successful software engineer before. His message of perseverance and determination resonated with the students, who were inspired to pursue their passions and work hard to achieve their goals.
Apart from his motivational speech, Shuvho also conducted a workshop on WordPress, a popular content management system used by millions of websites around the world. He showed the students how to create a website using WordPress and explained the basics of web development.
The students were enthusiastic about the workshop, and many of them showed a keen interest in learning more about web development and software engineering. Shuvho’s workshop was a great opportunity for the students to learn about a new field and to explore their interests.
Overall, the career development seminar was a huge success, thanks in no small part to Al Rubyat Shuvho’s inspiring speech and engaging workshop. Shuvho’s passion for software engineering and his commitment to helping others achieve their goals have made him a role model for many young students in the region.
In conclusion, the career development seminar “প্রেরনারগল্প” was a great initiative to motivate and inspire young students in Chirirbandar upazila. Al Rubyat Shuvho’s speech and workshop were instrumental in achieving this goal, and his message of perseverance and determination will continue to inspire students for years to come.
The seminar provided a unique opportunity for young students to interact with industry experts and gain valuable insights into their chosen fields of study. Through a series of engaging workshops and interactive sessions, participants were able to develop practical skills and gain a deeper understanding of the various career paths available to them.
Moreover, the event also provided an excellent platform for networking and connecting with other like-minded individuals. Students were able to build relationships with professionals from a variety of industries, which could prove invaluable in their future careers. The seminar also provided a valuable opportunity for students to learn about the latest trends and developments in their chosen fields of study, which could help them stay ahead of the curve as they progress in their careers.
Overall, the Career Development Seminar at Chirirbandar was a resounding success. It served as a powerful reminder of the importance of investing in the future of our youth, and provided valuable support to students as they embark on their career journeys. We hope to see more initiatives like this in the future, as we work together to inspire and empower the next generation of leaders and innovators.